Pages

Wednesday, December 22, 2010

Reindeer and Homemade Peanut Butter Cups

Have you ever seen a real reindeer?  I couldn't seem to remember it if I had and Georgia certainly hadn't seen one.  So you can imagine how excited we were when Kerri chose to take a trip out to Laughing Valley Ranch in Idaho Springs in celebration of her Winter Birthday.  Georgia now thinks Kerri should choose all birthday celebrations from here on out....I have to agree, she knows how to keep her imagination alive.  Our plans diverted when we realized that the Ranch is only open in the off season.  Seems obvious now that we think about it.  This time of year those Reindeer are hard at work.....touring.  Yep, touring... like Florence and Mary without Diana.  Exciting but kinda missing an essential element.  No offense to Florence and Mary or Donner and Blitzen for that matter.  We were told that they were scheduled to appear at the Hyatt Denver Convention Center on the front lawn....which led me to wondering where the "lawn" would be in front of the Hyatt in downtown Denver.  We swung by to meet Kerri and walked to the 16th Street Mall and on to the Hyatt.  The front lawn was a small corner of concrete near the valet.  Nothing says Christmas like two reindeer on a slab of concrete downtown munching out of a kitty litter container.  All of this aside, they were pretty much even more precious than I had imagined all these years.  

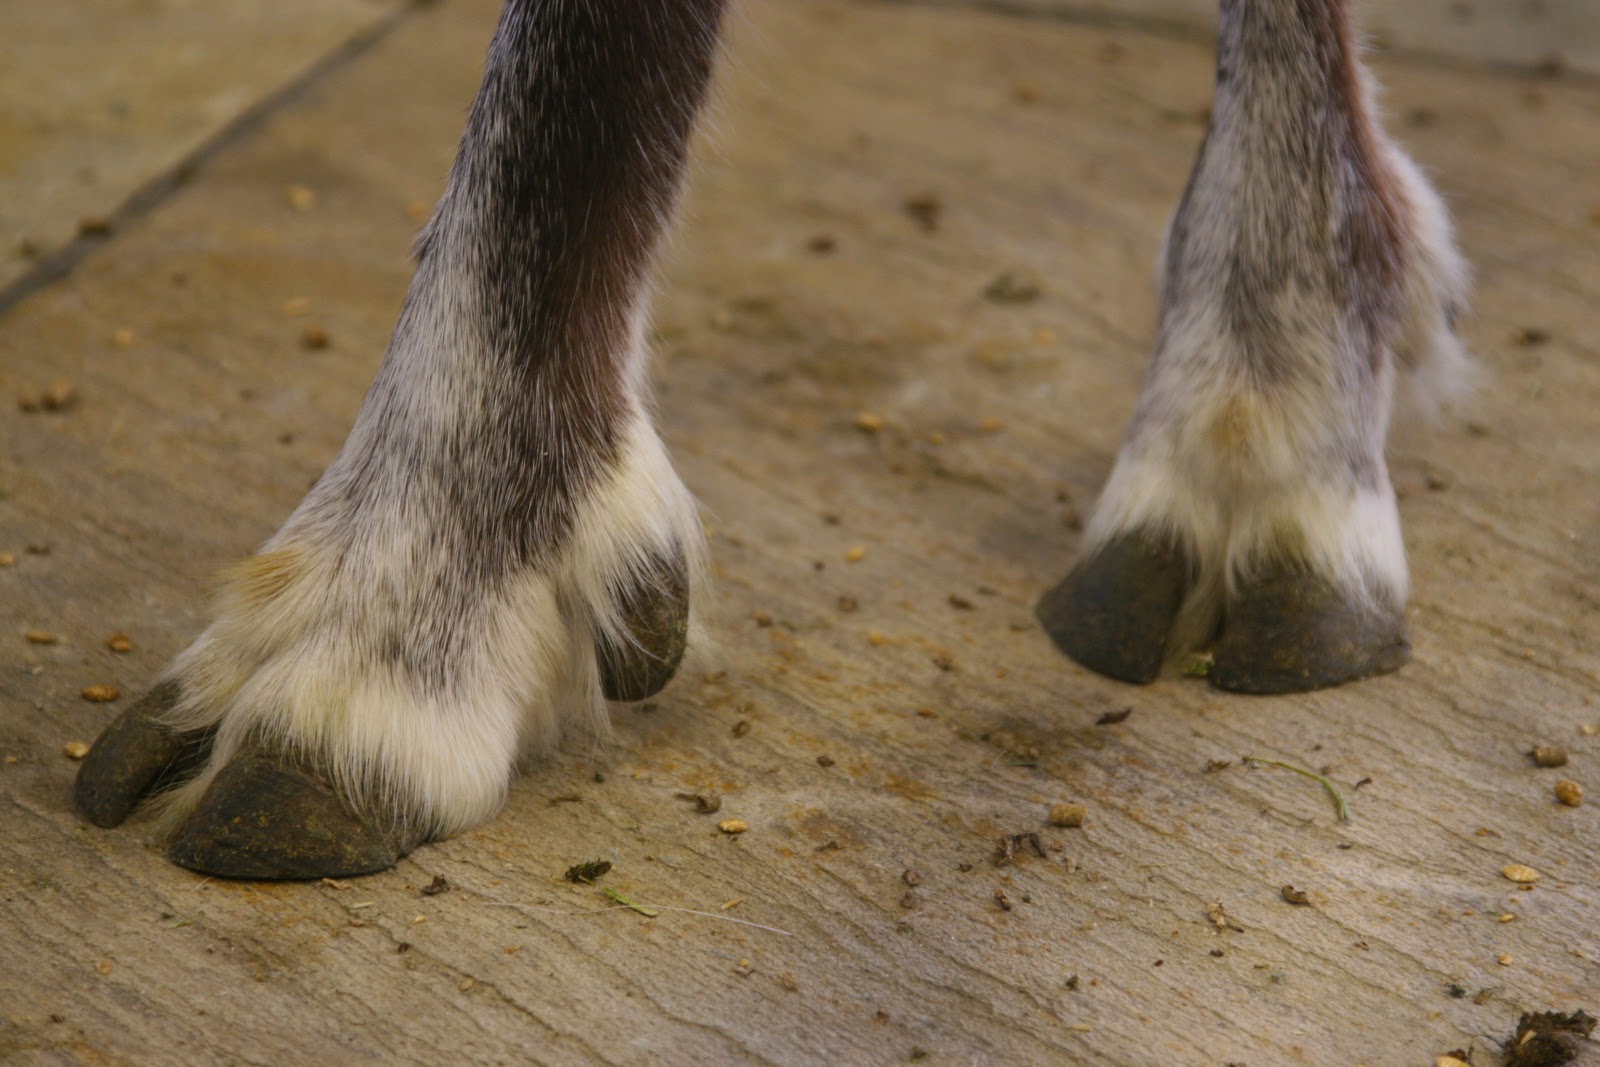
Kerri's Favorite
Are these hooves amazing?
It's as if they have furry leg warmers on.
This gal was near a panic attack, Bless her heart.
We hope the off season is more relaxing for her.

Check out her rack...that's right!  Her.

According to the Alaska Department of Fish and Game, while both male and female reindeer grow antlers in the summer each year (the only member of the deer family, Cervidae, to have females do so),  male reindeer drop their antlers at the beginning of the winter, usually late November to mid December.  Female reindeer retain their antlers till after they give birth in the springs.

Therefore, according to every historical rendition depicting Santa's reindeer, every single one of them, from Rudolf to Blitzen....had to be female.

We should've known this when they were able to find their way.


David and Kerri
Georgia was showing her how to get the reindeer to come over.
Making friends everywhere she goes.
Happy Birthday Kerri!
Make a Wish.


HOMEMADE PEANUT BUTTER CUPSVIA THE JOY OF BAKING

Set out 36 cups.
Make sure little fingers aren't curious what it feels like to
crush them...
Also....make sure that your darling little
one doesn't sneak into your bathroom to
put her face on.....If she does, call her
back in and have her...

Fill a half cup with Peanut Butter.
If you do this she will probably ask to lick
her fingers.
This is ok.

Melt your butter and peanut butter in the microwave stirring
every twenty seconds until it is melted.
Mix in your powdered sugar and it should look like
this.  If your man is a peanut butter cup connoisseur and asks
to test it to make sure it is sweet enough it is
safe to allow it.  It's up to you.
But he may ask for a dash more powdered sugar...
Get your double boiler ready.
Toss half semi sweet half milk chocolate with a tbs. of shortening.
I know...shortening.  Am I the only person on the face of the
earth that didn't know that these delectable little morsels contained
this evil stuff?  I am?  Ok, it's cool.

Get your water simmering.
I'm impatient and put my chocolate on premature.
It still worked out ok.

Keep an eye on that kiddo....she's tossing chocolate chips
like they're....chocolate?
You can run to the ladies room, toss clothes in the dryer,
or change your Pandora station.  But quickly!


Or snap a picture of the love in your life while he saves
the world via Xbox.

I could have lapped this up but it may have not been very
lady like....so I opted for a photo.
Purdy, isn't it?

Now, the cups I found where in between the teeny and the cupcake size.
I dolloped a tsp. of chocolate in the bottom and rolled little
balls tsp. size of the peanut butter and plunked on top.

Yummers, is that a Rachel Ray thing?
Ick. 
Ta DAAA.
I had to mix up a bit more chocolate to compensate my
larger cups.  I then told EVERYONE to keep they're grubby
little hands off....even when my precious girl offered to make sure they weren't poisonous.

Peanut Butter Cups:
1/2 cup (125 grams) creamy peanut butter
2 tablespoons (28 grams) unsalted butter, room temperature
1/2 cup (55 grams) confectioners (powdered or icing) sugar
Chocolate Coating
9 ounces (255 grams) semi sweet chocolate, coarsely chopped
9 ounces (255 grams) milk chocolate, coarsely chopped
1 tablespoon (10 grams) shortening


Peanut Butter Cups: Line 36 miniature muffin cups with paper liners.
Place the peanut butter, unsalted butter, and salt in a microwaveable bowl, and heat in the microwave for about  one minute or just until soft, but not melted(check and stir the ingredients every 20 seconds). Stir in the  confectioners sugar.
Melt the chocolates and shortening in a heatproof bowl placed over a saucepan of simmering water.
Drop a teaspoon of the melted chocolate into each of the paper lined miniature muffin cups. Top with a scant teaspoonof peanut butter mixture. Then top with another teaspoon of melted chocolate. Refrigerate until  set. Store in an airtight container in the refrigerator.
Makes about 36 peanut butter cups.


Happy Faces All Around!
Merry Christmas!
Onto more baking!


Tuesday, December 14, 2010

Oklahoma 2002-Denver 2010

 Blake, Corby, and David
 2002
My Boys.
I pause here looking at this picture.  Remembering flashes through
not only the years but from this night.  This picture smells like Corby,
sounds like Ani Difranco,
 and feels like home.

All three of these men helped shape who I am today.
I will carry that with me every day,
for all my days.
Until we are together again.


David and Priscilla
2002
Awwww, look at us.  These pictures scare David.
He always asks...."Why did you paint your face white?"
I have repeatedly told him...."It wasn't paint just the wrong
makeup, I suppose. " Yet he continues to ask and be
disturbed by these pictures of me.  I have to agree. I'm
quite pale....I miss that dress.  I would still wear that.
Yep, Yep.  That's us at prom.
Aren't we precious?

I thought it would be funny to show up at the door with
the wings from the above picture on.
He never even acknowledged them.
He has
always allowed me...to be me.
He also wore a purple orchid for me.
I should have known then I
would share my life with him.


I think this night I knew.
We had been together a week...

Check out that stunning bride in the back!


Our 1st Picture All Together...
minus Teague.

Our 1st Picture Taken Together
in Denver, Colorado
2010


To Another Ten.
I love you, David.

Monday, December 13, 2010

December Weekends

For those of you that requested this blog....you also requested my many, many failures.  This far exceeds the cheeseburger coconut cake.

Kerri and I decided that it would be fun to make a gingerbread house from scratch.  I used a recipe from King Arthur Flour's and we spent hours of chilling, rolling, and sketching out the template....with a tape measure.......this was what came out.  Our Gingerbread House....isn't she a Beaut???  This was the result after an attempt at icing which resulted in gingerbread in shambles.  I then wiped off all of the icing with many towels and determined a glue gun was then next best bet.  After hours in the kitchen we were not turning back.  It paid off TA DA.  Aren't you impressed?

There are no words.

We added a "brick" and decided it was best to wait
until David was home.  We knew he would be so impressed with us.
After which we would shake our house to see if it could withstand
the weight of icing and candy.

And it did.

Amazing what a little paint does, no?

We were all so proud!

A little moment in the day...
Teague in a helmut.


Sunday

Olive Focaccia/Roasting Pumpkins/Roast w/Pumpkin
Too Many Projects

I've been in a funk all week and hadn't felt much like being in the kitchen.  Sunday I woke up and decided I'd get busy.   
It was Family Dinner Night and I knew I needed to get my roast in.  I had two leftover pumpkins, two potatoes, some baby carrots, an acorn squash, and some frozen green beans.  On top of that, very little motivation to make a trip to the grocery store.  This as usual led me to my dear friend, Google.  We've been eating a lot of red meat and I'm just about over it.  I was craving something light and unique but beginning with a roast. This was near impossible.  I came across a recipe for Roast with Pumpkin wedges with a garam masala rub.  I then proceeded to match this with what I had.  I googled "make garam masala."  I had a little over half the spices but proceeded anyways.  I always hear that my Uncle Larry is doing this and he's a fabulous cook.  Why can't I?

I linked the recipe from Fig and Cherry in the above title.  Instead of the oven I used the crock pot. David and I peeled 12 cloves of garlic... (we love our garlic) and placed it at the bottom of the crock pot.  In a bowl I added 2 tbs. Cumin, 1 tsp. Cinnamon, 1 tsp. Nutmeg, 1 tsp. Paprika, and the rest of my beloved Saffron. Goodbye my friend.  I then rubbed that Big Boy down.  Threw 10 cloves in the bottom because we do everything in excess.  I then cut up enough pumpkin and acorn squash to fill up my pot.  I rubbed them all down in the remaining spices and tossed three bay leaves in.  I poured about a cup of olive oil on top and set on low.  After about thirty minutes, David asked me if I had added any liquid.  I told him the recipe didn't ask of any...  He asked me if I followed the recipe....he was being polite.  He knew I hadn't.  He suggested I add some stock, all I had was Chicken Stock so I added about four cups of stock and let it  slow cook on low for 8 hrs.  Occasionally, I moved my veggies around.

*Afterthoughts:  This really could have used the Cardamom.  I would have given it a sweet layer that I think it needed.  I could have used brown sugar as that was about all I had to offer.  I think it would have given it the depth that it lacked.  All in all, it was a delicious meal and was a great alternative to a traditional roast.  Also, it was impossible to make a "light" dish out of a roast.  Cheers to wishful thinking.

This was the only picture I took of the
Roast with Pumpkins.
I was a bit distracted as you will see.


Roasting Pumpkins


I cut this baby in half and set a baking sheet beneath to
catch any cooking liquids.
Let her roast for and hour and a half.
You can see the chunk I cut off to use with the roast.
Isn't that color brilliant!
 I could have painted my walls
with this.
I wish I had come up with a use for these peels.
They were beautiful.
They pulled away from the pumpkin flesh
perfectly.  I did this while it was hot!
You might want to wait and let cool.

I threw all the flesh into the bowl.
At this point I was thinking....
"Never again canned.  This is a cinch!"
And then the pureeing began...

I think I've spoken to you all about not being deterred by lack
of specific equipment.  I do not have a food processor.  I used a
blender to puree this......This morning I found two splats of pure
 above my laundry room door and have highlights of
puree in my hair that have yet to be washed out.  My laundry room
door is across the kitchen from where I was blending.....


112 ounces of Pumpkin Puree

I froze all but one.

I still have one pumpkin left.

Oy Vey!


Olive Focaccia

I have had a...what I think is profound love of Focaccia since my days at Cafe 501.  If I had ever known it could be this easy I would have been making this all along.

Don't live your life without making Focaccia in your own home!


Warm water and little yeast.  I mixed it, Pdub let it set.
10 minutes.
Either way mine worked.  Again, I missed some steps.  This
was happening all while pumpkin puree was flying.
I mixed this with my flour, salt, and olive oil.

I again, used my hand mixer until it was too sticky and
finished with hand kneading.

Stuck it on my dryer for an hour and a half.

Chop up your olives.  My green olives had pits.  Argh.
This put me in a mood.
It worked out just fine.

Lovely, no?
Gave her a short knead and tossed my olives on top.
Now, I know this is shocking but I didn't pay attention
to the recipe and forgot to blot my olives dry.
This made my dough sticky and me irritable. 

I combined and made sure not to over knead.  I split the dough in
half and rolled into rectangles.  I always cover with tea towels and
try not to use plastic wrap.  This works just as well.  They went
back on the dryer for an hour.
Something to cheer me up.
Make dimples.
All over.
Go to town.

Hope my thighs don't look like this
after the bread.
Brush with olive oil.
Oh, how it sparkles with delight...
or is that me?

Sprinkle with course salt.
Pdub called for Kosher,
I used Mediterranean Sea Salt.

Either work but be familiar with your salt.
Over salting can mean...
RUIN.
Bake for 30 minutes.

I let one bake longer than the other.
We both preferred the one that went for the full thirty.
It was crunchy with a little softness in the center.

However, the other I put in a glass baking dish and
cooked it less time.  It is more thick due to the dish
 and softer. It will
be fabulous for sandwiches!


*I don't have time to proof this.  Let me know of my mistakes.
Love to you all this Holiday Season.


RecipeOlive Focaccia

  |    |    |  

Ingredients

  • 1-½ teaspoon Active Dry Yeast
  • 1-½ cup Warm Water
  • 4 cups All-purpose Flour
  • 1 teaspoon Kosher Salt
  • ⅓ cups Olive Oil
  • 1 cup Olives (any Variety Or Combination), Roughly Chopped
  • Olive Oil, For Drizzling
  • Kosher Salt, For Sprinkling

Preparation Instructions

Sprinkle yeast over 1 1/2 cups warm (not lukewarm) water. Let stand for a few minutes.
In a mixer, combine flour and salt. With the mixer running on low speed (with paddle attachment), drizzle in olive oil until combined with flour. Next, pour in yeast/water mixture and mix until just combined, and the dough comes together in a sticky mass.
Warm a non-metal mixing bowl in the microwave until warm. Coat it with a light drizzle of olive oil, and form the dough into a ball. Toss to coat dough in olive oil, then cover the bowl tightly with plastic wrap and set it aside for 1 to 2 hours, or store in the fridge until you need it.
To make focaccia, blot olives with a paper towel to remove excess moisture.
Remove dough from bowl and place on a lightly floured surface. Place chopped olives on top of the dough, then very gently knead the olives into the dough. (Don’t overknead!) Divide dough in half and roll each half into a large, thin oval/rectangle. Place on separate sheet pans (or cookie sheets) drizzled with olive oil. Drizzle more olive oil on top of the ovals, then cover each one with plastic wrap. Put in a draft-free/warm place for one hour.
Preheat oven to 400 degrees.
Remove the plastic wrap (dough will be puffy) and use your fingertips to press dimples all over the surface of the dough. Drizzle surface with olive oil and sprinkle with kosher salt. Bake for 30 to 40 minutes, or until focaccia is golden brown.
Cut into pieces with a pizza wheel or sharp knife. Serve immediately.